Hello there! As the title depicts this article is 3rd in the series of Junior SQL DBA Interview Questions Answers. Please go through the first two articles Junior SQL DBA Interview Q&A and Junior SQL DBA Q&A – Part2 .
By the way though it is about Junior SQL DBA Interview, you may get these questions for mid to senior level DBAs as well. In the first place Interviewer generally starts with very basic questions.
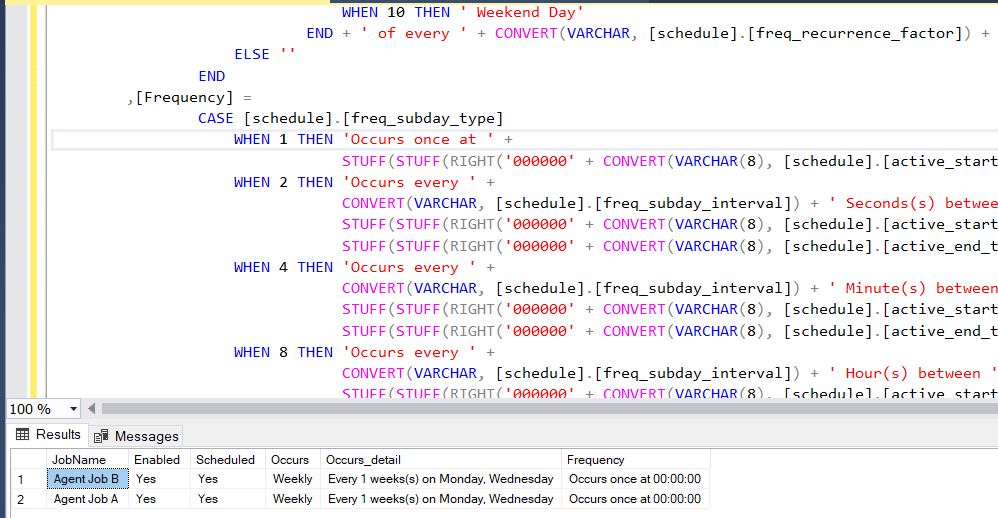
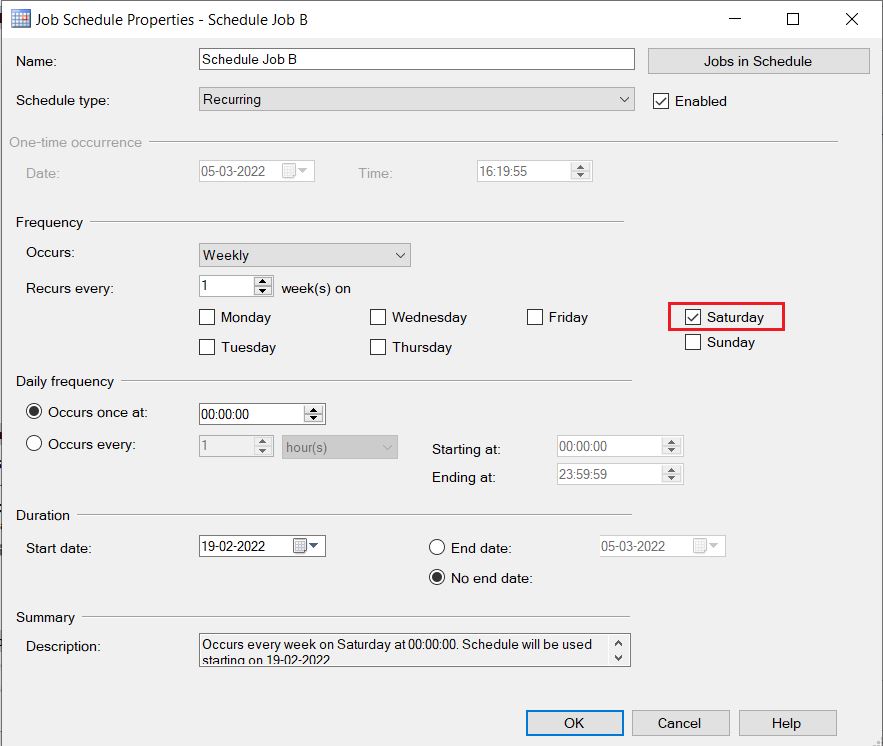
1. What are the different types of SQL Server database Backups?
Ans: SQL Server supports the following backup types:
- Full
- Differential
- Transaction log
- Tail log
- Copy Only
- File and Filegroup backup
- Partial backup
Full Backup: A full database backup backs up the whole database. This is a complete copy, which stores all the objects of the database: Tables, procedures, functions, views, indexes etc. This includes part of the transaction log required to fully recover the database.
Differential Backup: Backup all changed extents since last Full backup. Basically it contains all changes since the last full backup.
Transaction log Backup: Also usually called as Log backup, backups all transactions in the database transaction logs since the last log backup. Important to realize that the transaction log backups are incremental and differential backups are cumulative in nature.
Tail log Backup: A tail-log backup captures all log records that have not yet been backed up to prevent work loss.
Copy Only Backup: A copy-only backup is a special type of SQL Server backup that is independent of the sequence of conventional backups. In other words it does not change the differential base and hence does not affects the database restore sequence.
File Backup: This allows you to backup each file independently instead of having to backup the entire database. This is useful when you have a very large database.
Filegroup Backup: This type of backups allows you to backup all files that are in a particular filegroup.
Partial Backup: This allows you to backup only Read-Write Filegroups and exclude Read-Only Filegroups. This is useful for very large database.
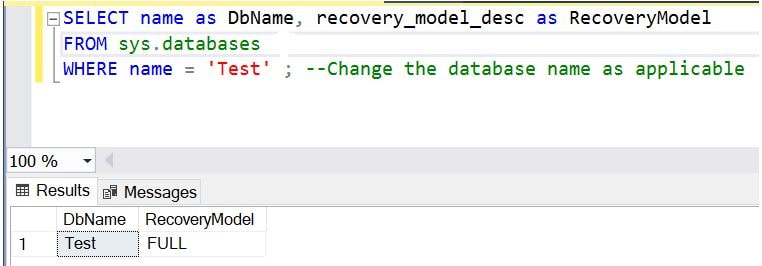
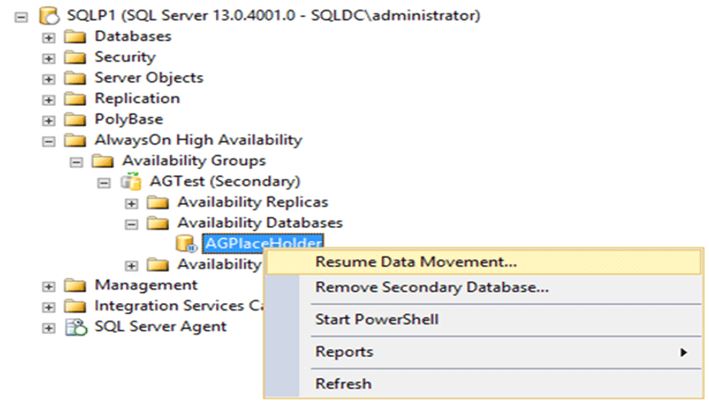
2. How can you verify your database backups and make sure they are restorable?
Ans: Using RESTORE VERIFYONLY command we can verify.
RESTORE VERIFYONLY FROM DISK = ‘C:\AdventureWorks.bak’ — Backup path including Filename GO Output: 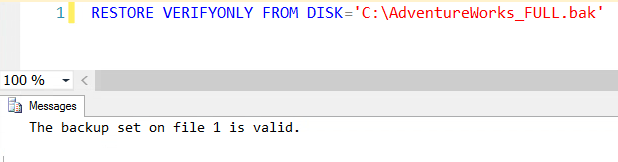
3. Is it possible to backup RESOURCE database?
Ans: NO! it is not possible to backup RESOURCE database using conventional methods. However you can take physical file level backup of .mdf and .ldf files.
4. What is the password policy of SQL Server?
Ans: SQL Server is able to utilize the password policy mechanisms of Windows. SQL Server login authentication uses this password policy.
SQL Server can apply the same complexity and expiration policies used in Windows to passwords used inside SQL Server.
5. What is SQL Server Login?
Ans: A person or application can connect to a SQL Server instance using a login, which is a user account used for authentication.
6. What is a database user in SQL Server?
Ans: To connect to the database, a user account called a database user is created at the database level in SQL Server. A login created at the server level is typically mapped to a database user.
7. What is a schema in SQL Server?
Ans: A schema in SQL Server is a collection of objects, such as tables and views, that are owned by a specific user. Schemas can be used to group objects together and to provide an additional level of security.
8. What is a database role in SQL Server?
Ans: A specific set of permissions within a particular database is granted to a group of users known as a database role in SQL Server. You can use database roles to simplify the management of permissions and enhance security. SQL Server has fixed database-level roles built in, and you can create additional roles as needed.
9. What is SQL Server role?
Ans: SQL Server level roles lets group user logins together and manage server-level permissions. Server-level roles help manage permissions for the entire SQL Server instance. SQL Server provides several built in server roles, but you should add your own specific roles if possible. You can’t change fixed server roles.
10. What is the difference between SQL Server login and user?
Ans:
Microsoft SQL Server uses logins to authenticate users to the server. These logins function as security principals that connect users to the server and associate them with server-level roles that allow certain activities.
A user is a security principal that authenticates access to a database. It associates with a database-level role that grants permission for specific activities within the database.
In summary, logins authenticate users at the server level and users authenticate at the database level.