Browsing: Backup Restore

Tips to Improve SQL Database Restore Performance

Introduction:

If you’re a database administrator, you know that restoring a database from a backup can be a time-consuming process. In the last article Top 5 Tips To Speed Up SQL Server Backups we discussed about tips to improve the SQL Database Backup Performance.

In this blog post, we’ll explore the top tips for making SQL database restores faster. These tips include using faster hardware, using multiple threads, using compression, using partial restores and more will help to improve SQL Database Restore Performance.

Use Instant File Initialization:

There are ways to optimize the process of creating new files for a database during a restore, particularly when restoring for the first time or using the WITH MOVE option. This feature, available in SQL Server 2005 and above, allows the operating system (which must be Windows XP or newer or Windows Server 2003 or newer) to quickly initialize the new files. To utilize this feature, the account that SQL Server is running under must have the appropriate security settings, such as being a member of the Windows Administrator group on the server or having the Perform Volume Maintenance Tasks security policy.

Use Multiple Files:

If you have multiple disk drives you can radically improve the speed of backups, and going the other way, restores. You do this by splitting the backup up amongst the multiple drives by using more than one backup file. It will require syntax changes to both your backup and your restore commands. This is directly related to throwing hardware at the problem, but instead of concentrating on faster disks, you’re concentrating on more disks.

Use multiple threads:

Another way to speed up database restores is to use multiple threads. This allows the restore process to run concurrently on multiple CPU cores, which can significantly reduce the overall restore time. To use multiple threads in SQL Server, you can use the WITH (MAXDOP) option in the RESTORE DATABASE statement. For example:

RESTORE DATABASE mydatabase
FROM mybackup
WITH (MAXDOP = 4)

Use compression:

Compressing the backup file before performing the restore can also help reduce the restore time. SQL Server supports both data compression and backup compression, which can significantly reduce the size of the backup file. To use compression in SQL Server, you can use the WITH COMPRESSION option in the BACKUP DATABASE statement. For example:

BACKUP DATABASE mydatabase
TO mybackup
WITH COMPRESSION

Use faster hardware:

One of the most obvious ways to speed up database restores is to use faster hardware. This could mean upgrading your server’s CPU, adding more RAM, or using faster hard drives or solid-state drives (SSDs). If you’re restoring a large database, these hardware upgrades can make a significant difference in the restore time.

Use a faster network connection:

If you’re restoring a database from a remote location, the speed of your network connection can impact the restore time. If possible, use a faster network connection or a direct connection to the server to reduce the restore time.

Recovery:

A significant portion of the restore process involves transferring data from the backup file to the data files, but there is one additional step at the end called recovery. During recovery, any transactions that were completed during the backup are applied to the data, while those that were not completed are rolled back. The amount of time this takes can vary significantly depending on the size and number of transactions. The Recovery Interval setting in SQL Server determines the frequency of checkpoints, with a default value of zero meaning that checkpoints occur at regular intervals determined by the SQL server. Changing this value to a higher number will result in more transactions occurring before a checkpoint, which can extend the recovery time. However, unless frequent checkpoints are causing performance issues, it is generally recommended to leave the Recovery Interval set to zero for faster recovery.

Conclusion:

Restores can be intimidating and stressful, but implementing the best practices outlined in this article can help reduce anxiety and improve the speed of the restore process. It is important to regularly practice restore operations to ensure that you are prepared in case of a real disaster. Lack of familiarity with the restore process is a common issue that can cause significant difficulties. By following these tips and regularly practicing restores, you can minimize the risk of encountering problems during a real restore operation.
{ Add a Comment }

Top 5 Tips for Speeding Up SQL Server Backups

Introduction to SQL Server Backup Performance

Backing up your SQL Server databases is an essential part of any database maintenance plan. However, backups can also be a time-consuming process, especially for large databases. In this article, we will go over 10 proven strategies for speeding up SQL Server backups. These techniques can help you optimize your backup process and save time.

1. Use Faster Storage

One of the biggest factors that can affect backup performance is the speed of the storage where the backup is being saved. If you are using a slow hard drive or network share to store your backups, it will take longer to complete the backup process. To improve performance, consider using faster storage such as a solid-state drive (SSD) or a high-speed network attached storage (NAS) device.

2. Compress the Backup

Another way to speed up backups is to compress the backup file. SQL Server supports several different types of compression, including data compression and backup compression. Data compression can reduce the size of the data in the database, which can also improve backup performance. Backup compression compresses the backup file itself, which can reduce the amount of time it takes to write the backup to storage.

3. Use Multiple Backup Files

If you are backing up to a single file, one thread is assigned that can be the bottleneck for your backups. To improve performance, you can use multiple backup file in parallel. In this case multiple threads will be used.

The below example code creates Full backup across four disks:

BACKUP DATABASE AdventureWorks
TO DISK=N'E:\SQL Backups\AdventureWorks\AdventureWorks_Full_1__20231001.bak',
DISK=N'F:\SQL Backups\AdventureWorks\AdventureWorks_Full_2__20231001.bak',
DISK=N'G:\SQL Backups\AdventureWorks\AdventureWorks_Full_3__20231001.bak',
DISK=N'H:\SQL Backups\AdventureWorks\AdventureWorks_Full_4__20231001.bak'

4. Schedule Backups During Off-Peak Hours

If your database is in use during the day, the backup process can slow down due to increased activity on the server. To improve performance, consider scheduling backups to run during off-peak hours when there is less activity on the server.

5. Use Partial Backups

A partial backup is a backup of one or more filegroups or files in a database. This can be a faster option than a full backup, especially if you only need to back up a small portion of the database. However, it is important to note that you will need to restore the partial backup in addition to any other backups to restore the entire database.

Example Backup Script

Here is an example T-SQL script that demonstrates how to use some of these techniques to improve the performance of a database backup:

-- Set the backup compression level
BACKUP DATABASE AdventureWorks
TO DISK = 'C:\AdventureWorks_Backup.bak'
WITH COMPRESSION, COPY_ONLY;

This script creates a compressed, COPY_ONLY backup of the AdventureWorks database and saves it to the specified file path. By using the COMPRESSION and COPY_ONLY options, we can create a faster, more efficient backup.

The COPY_ONLY option allows you to create a backup without affecting the database’s transaction log. This can be useful if you want to create a “point-in-time” backup without disrupting the log backup chain. By using the COPY_ONLY option, you can create a backup more quickly because the transaction log does not need to be backed up as well.

Conclusion

By following these tips and techniques, you can significantly improve the performance of your SQL Server database backups. Whether you are using faster storage, compression, multiple backup devices, or the COPY_ONLY option, there are many ways to optimize your backup process and save time.

You may also want to check Tips to Improve SQL Database Restore Performance

{ Add a Comment }

NetBackup SQL Database Restore

<<Previous

This article is in continuation of SQL Database Restore using Netbackup. If you have landed here directly then please read the above article first so that this article make sense to you.

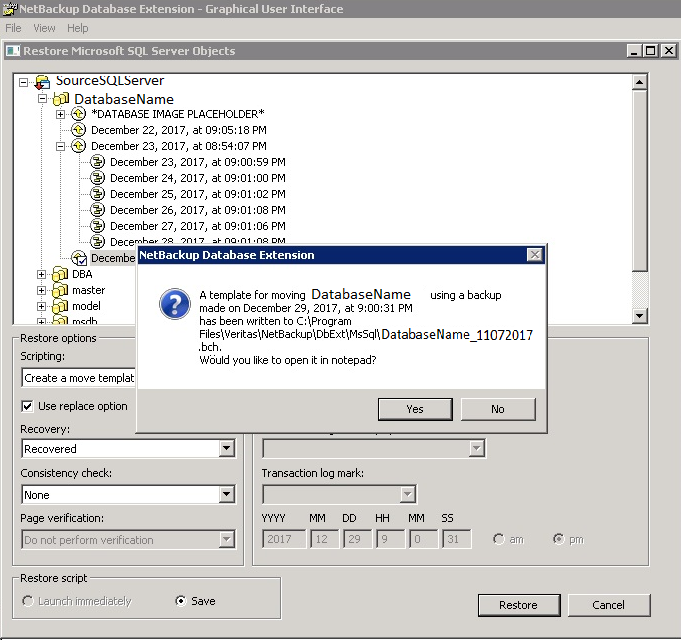
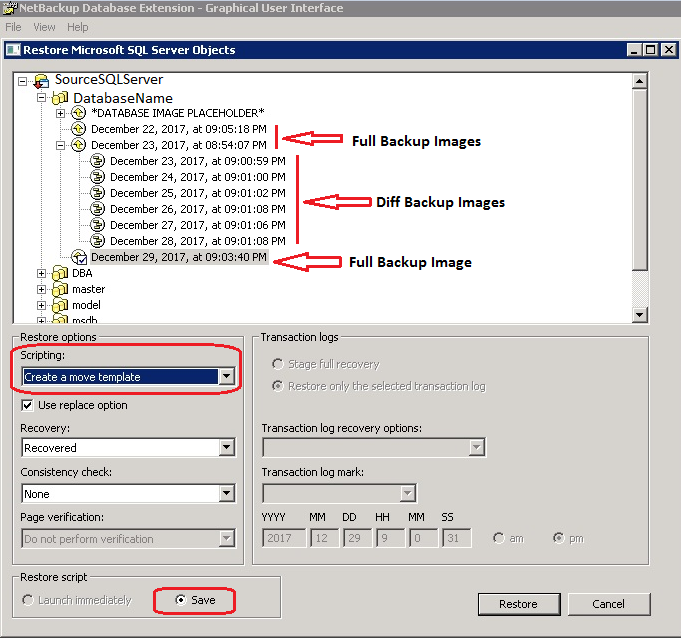
In the below screen shot I have shown full and differential backup images. I am going to show you the steps for restore using full backup image.

For Scripting choose “Create a move template”. This will create a restore template (.bch file) and the Save radio button will get selected by itself.

NetBackup object wizard

Click on Restore.
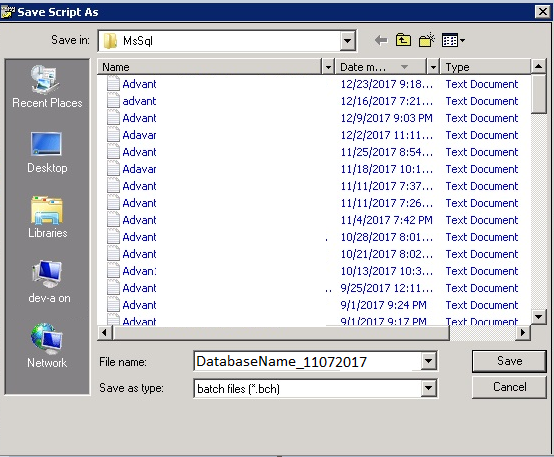
Provide a meaningful filename for the .bch file.

NetBackup restore shwoing .bch file

Click on Save.
You’ll get a pop up message asking “Would you like to open it in notepad?”
Click on Yes.

NetBackup restore showing pop up message

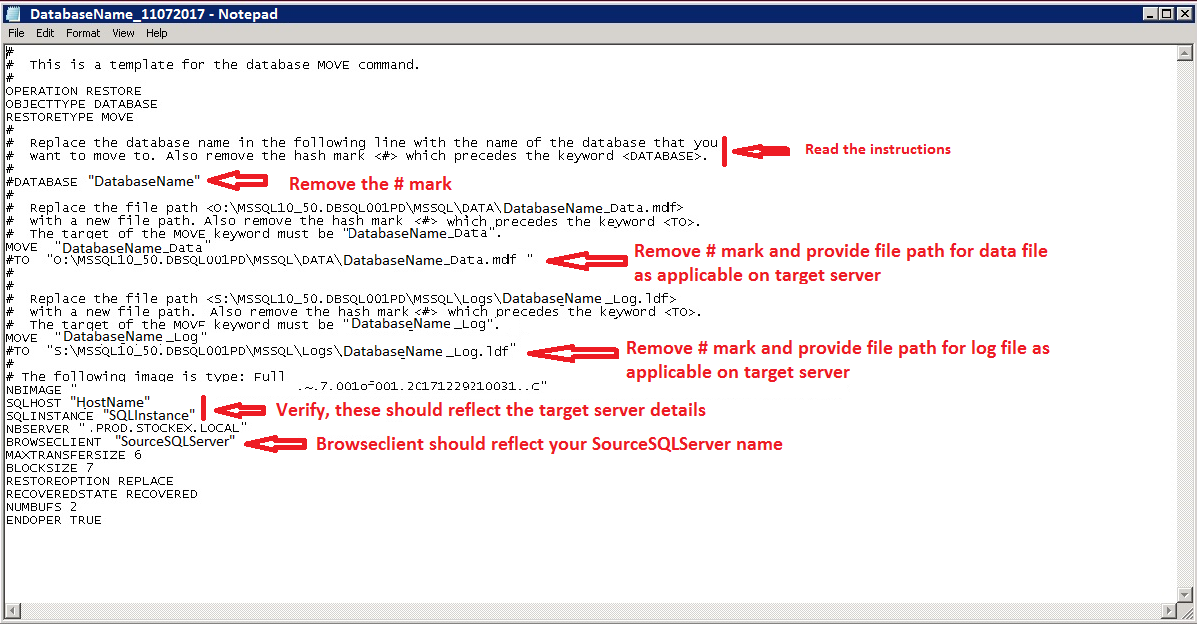
In the below screen shot I have explained what all places you have to make the changes. This is very important and you have to pay attention:

Template/script showing different places to modify:
NetBacup restore showing places to change file names

Note: If you choose differential backup image to restore, the tool will automatically choose the base full database backup image. So in that case you have to make the same changes for all the data and log file locations.

And same goes with log file restore as well. Once you are done with all the changes save the file.
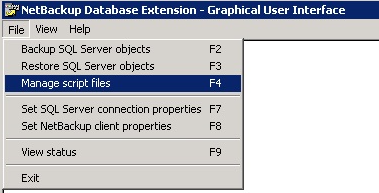
Now go to File > Manage Script Files:

NetBackup Restore showing Mange Script Files option

Select the created template. e.g. “DatabaseName_11072017” as shown in the below screen shot.
Click on Start.

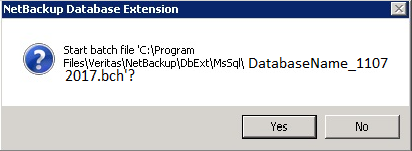
It will ask for confirmation. Click on Yes.

NetBackup Restore confirmation message

Another self-explanatory message will pop up.
Clock on Ok.
NetBackup Restore step

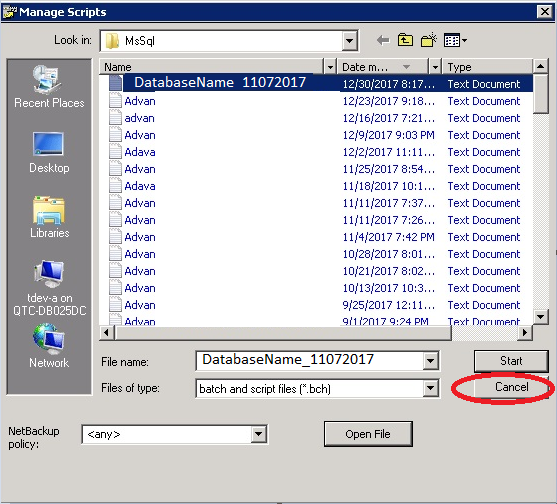
It will take you back to the “Manage Script” wizard.
This is a bit confusing or rather a bug. Just click on Cancel.
NetBackup Restore tool bug

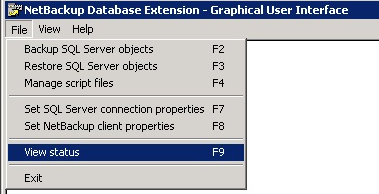
Your restore process should start and can be viewed the progress in File > View Status.

NetBackup Restore view status

Hope this is helpful. Please leave your comments below. Also let me know if you have any questions.
You may like the below articles as well:

Remove or Delete Tempdb data file without SQL Service restart

SSRS Encryption Key Backup Information

Use Windows Authentication with a different User in SSMS

{ 2 Comments }

SQL Database Restore using NetBackup

In this article I am going to explain how to perform Database restore using NetBackup tool. I was fortunate enough to learn from experienced people, otherwise it was difficult to follow the materials provided. In this post I have tried to explain the database restore process in detail.

Launching NetBackup Tool and connecting to SQL Instance:
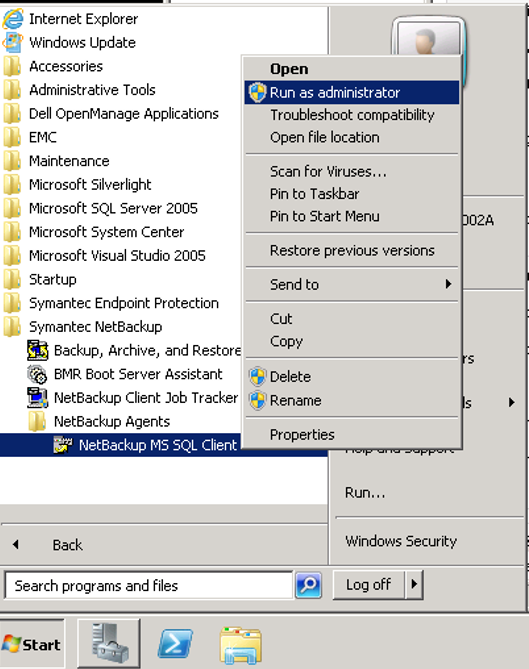
  • Click on Start > All Programs > Symantec NetBackup > NetBackup Agents > Right Click on NetBackup MS SQL Client > Run as Administrator as shown in the following example:

Note: Run as Administrator is a very important step, otherwise the tool won’t connect to SQL Instance and throws ambiguous error messages.

Image showing lunching NetBackup using Run As Admin option

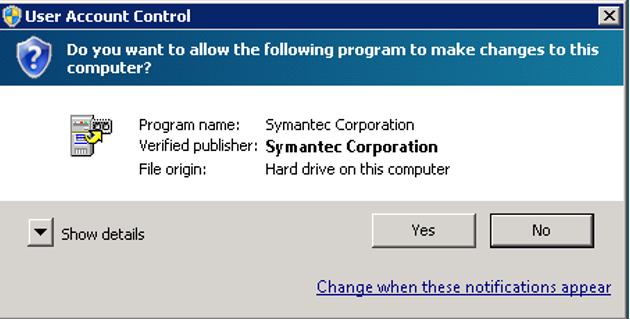
  • In the User Account Control Window click on Yes.

Image of User Account Control Wizard

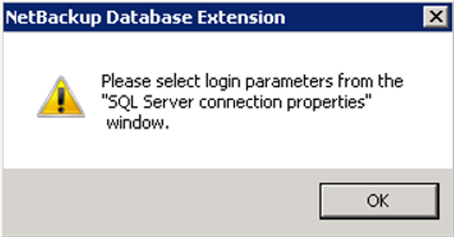
  • In the NetBackup Database Extension Window click on Ok to select the connection properties.

Image of NetBackup Database Extension Wizard to choose the connection properties

Now let’s see the ways to connect default and named SQL instances through NetBackup tool.

To Connect Default Instance:
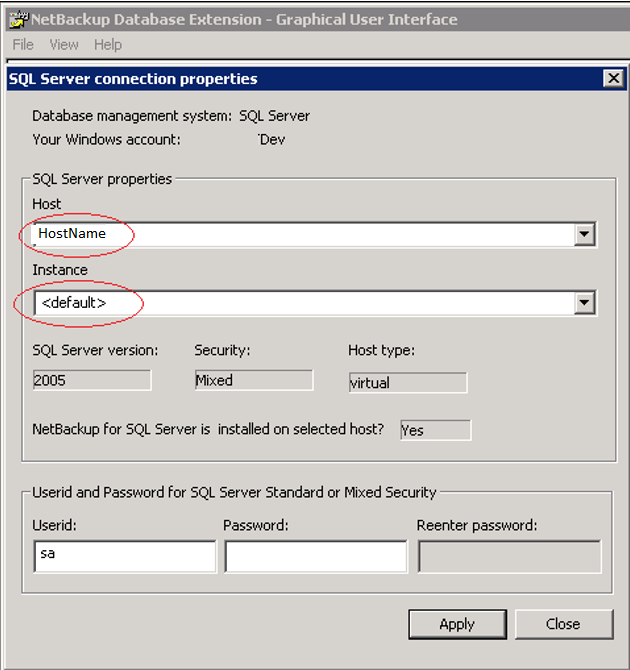
  • In the SQL Server Connection properties window put the host name.
  • For Instance field, leave it as default click on Apply and then Close.

Image showing connection properties for default instance

Note: You do not have to put any credentials for UserId field. Leave it as default. SQL Server version, Security and Host Type will be populated once it is connected as shown in the above screen shot.

To Connect Named SQL Instance:
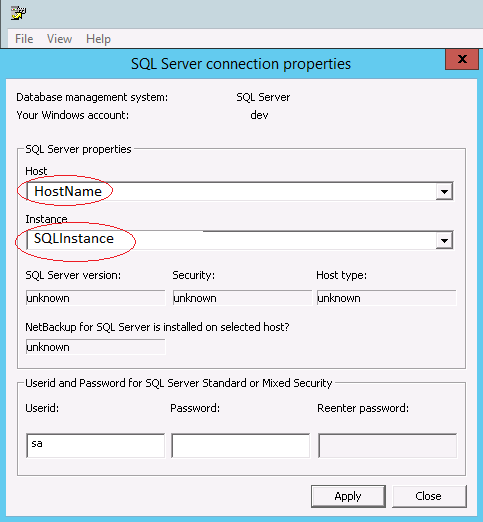
  • If the SQL Instance name is HostName\SQLInstance, you need to put the host and Instance name as shown in the following screen shot.
  • Click on Apply and then close.

Image about NetBackup connection to Named Instance

Now you are connected to the target Instance. You can always verify if you are connected to the correct instance from File > Set SQL Server Connection properties.

Database Restore Steps using NetBackup:

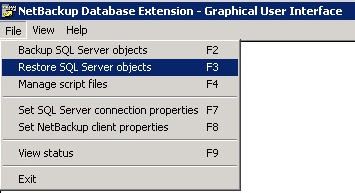
Go to File > Restore SQL Server Objects

Image showing NetBackup Restore step

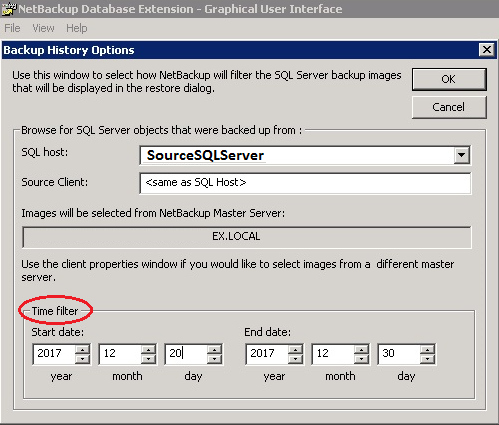
Provide the SQL Server Instance name from which backup has to be restored, i.e. Source SQL Server name.

Image showing NetBackup history

You can use time filter to view the backups in particular date range.

Note: Unlike native backup of SQL Server, NetBackup tool does not create any .bak files which can be copied from source to destination. The backup files/images are scattered on storage. This is the reason you have to provide Source and Destination Server name during the restore process.

Click on Ok to go the next wizard “Restore Microsoft SQL Server Objects” >>Continue Reading

{ Add a Comment }