Hello, Today we I am going to provide you with a query to List SQL Database Role Owner Across All Databases. In the article Query To List SQL Database Role Owner we have seen how to List The Database Role Owner for a single Database.
This query will be nice to have in the repository in case you want a audit report for all databases on a SQL Instance.
DECLARE @dbname VARCHAR(50)
DECLARE @statement NVARCHAR(MAX)
CREATE TABLE #databaseRoleOwner
(
[DatabaseName] sysname,
[RoleName] varchar(100),
[RoleOwner] varchar(100)
);
DECLARE db_cursor CURSORLOCAL FAST_FORWARD
FOR
SELECT name
FROM master.sys.databasesWHERE state_desc='online'OPEN db_cursor
FETCH NEXT FROM db_cursor INTO @dbname
WHILE @@FETCH_STATUS = 0
BEGINSELECT @statement = 'use ['+@dbname +'];'+ 'SELECT dbname=db_name(db_id()),
name AS RoleName,
USER_NAME(owning_principal_id) AS RoleOwner
FROM
sys.database_principals
WHERE
type = ''R'' and name NOT IN (''public'', ''db_owner'', ''db_accessadmin'',''db_securityadmin'', ''db_ddladmin'',''db_backupoperator'',''db_datareader'',
''db_datawriter'',''db_denydatareader'',''db_denydatawriter'')'INSERT INTO #databaseRoleOwner ([DatabaseName],[RoleName],[RoleOwner])
EXEC sp_executesql @statement
FETCH NEXT FROM db_cursor INTO @dbname
ENDCLOSE db_cursor
DEALLOCATE db_cursor
SELECT * FROM #databaseRoleOwner
GO -- DROP TABLE #databaseRoleOwner
Example Result set:
Let me know your thoughts by leaving comments below. The following scripts are also useful for day to day DBA life.
Hi There! Today I am going to provide you with a simple Query To List SQL Database Role Owner. Understanding who owns a role helps database administrators (DBAs) track permissions and audit role management effectively.
Where Do you See the Database Role Owner?
In SSMS (SQL Server Management Studio), Expand the Database > Security > Roles > Database Roles > Right Click on the Role > Properties
Possible Scenarios:
These are few possible cases when you may need to to list out the Database Role Owners.
Review current role ownership across multiple databases.
Ensure roles are owned by intended users or service accounts.
Document security settings for compliance.
Query To List SQL Database Roles and the Owner:
USE SQLGeeksPro
GOSELECT Dbname=DB_NAME(DB_ID()),
name AS RoleName,
USER_NAME(owning_principal_id) AS RoleOwner
FROM
sys.database_principals
WHWRE
Type='R'
Hi There! This is going to be a quick guide for SQL Server FORMAT Function. Formatting data in SQL Server often plays a crucial role in reporting, data presentation, and user interfaces.
Here we’ll walk you through few examples of the FORMAT() function in SQL Server.
Introduced in SQL Server 2012, the FORMAT() function is used to return a value formatted with the specified format and culture (locale).
It is particularly useful when you need to:
Display results in a user-friendly format
Output locale-specific formats
Customize currency or date formats
2. Syntax of FORMAT()
It has a very simple Syntax
FORMAT( value , format [ , culture ] )
Now let’s understand the parameters:
Value: It is the value on which you want to apply the formatting. Not to mention, it should be one of the valid data types.
Format: Specify the format in which you require the output. (for example, "MM/DD/YYYY"). It does not support Composite formatting. This parameter should contain a valid .NET format string in the NVARCHAR data type
Culture: It is an optional parameter. By default, SQL Server uses the current session language. This language is set either implicitly, or explicitly by using the SET LANGUAGE statement.
Culture accepts any .NET Framework supported culture as an argument or else it raises an error.
3. Formatting Dates and Times
You can use FORMAT() to format date and time values using .NET date and time format strings.
Example 1: Formatting current Date in ‘yyyy-mm-dd’ or ‘dd-mm-yyyy’ format
SELECT GETDATE() AS DefaultDateFormat
GOSELECT FORMAT(GETDATE(),'yyyy-MM-dd') AS FormattedDate
GOSELECT FORMAT(GETDATE(),'dd-MM-yyyy') AS FormattedDate
GO
The result set is as follows:
In this case you can observe that the default date format of GETDATE() function is “yyyy-mm-dd hh:mm:ss.mmm” and we used the FORMAT() function to display it in “yyyy-mm-dd” and “dd-mm-yyyy” format.
Example 2: Display/Extract desired format from GETDATE()
SELECT FORMAT(GETDATE(),'d') AS ShortDateGOSELECT FORMAT(GETDATE(),'D') AS LongDateGOSELECT FORMAT(GETDATE(),'m') AS MonthDateGOSELECT FORMAT(GETDATE(),'g') AS [MM/DD/YYYY hh:mm AM/PM]GOSELECT FORMAT(GETDATE(),'G') AS [MM/DD/YYYY hh:mm:ss AM/PM]GO
You can observe the differences in result set for each parameter:
4. Formatting Numbers:
You can apply numeric format strings for currency, percentages, and custom number formats
Example1: Formatting Numbers
SELECT FORMAT(1234.56, '#,##0.00') AS [Comma Separated Formatted Number];
GOSELECT FORMAT(1234.56, '#,##0.000') AS [Comma Separated Formatted Number With Additional Decimal Place];
GOSELECT FORMAT(123456789, '#,#') AS [Thousand Separator];
GOSELECT FORMAT(123456789.566, '#,#.##') AS [Thousand Separator with rounded to a specified number of decimal places]
GOSELECT FORMAT(123456789, '##-##-#####') AS [Dash Separator];
GO
Notice the differences in output. Column names are self explanatory.
Example 2: Formatting Currency
SELECT FORMAT(1.5, 'c', 'hi-in') AS [Indian Currency / Rupee]
GO
SELECT FORMAT(1.5, 'c', 'en-US') AS [US Currency / Dollar]
GO
SELECT FORMAT(1.5, 'c', 'en-gb') AS [Great Britain Currency / Pound]
GO
SELECT FORMAT(1.5, 'c', 'de-de') AS [German Currency / Euro]
GO
SELECT FORMAT(1.5, 'c', 'ru-ru') AS  [Russian Currency / Ruble]
GO
SELECT FORMAT(1.5, 'c', 'gl-es') AS  [Spain Currency / Euro]
GO
The result set with self explanatory column names:
Example 3: Percentage Formatting
SELECT FORMAT(0.756, 'P') AS [Percentage]
GO
SELECT FORMAT(0.756, 'P0') AS [WholeNumberPercentage]
GO
SELECT FORMAT(0.756, 'P3') AS [ThreeDecimalsPercentage]
GO
SELECT FORMAT(0.756, 'P4') AS [FourDecimalsPercentage]
GO
SELECT FORMAT((47.0/48.0), '#,##.0%') AS [Percentage Rounded to One Decimal Place]
GO
SELECT FORMAT((47.0/48.0), '#,##.##%') AS [Percentage Rounded to Two Decimal Places]
GO
Result set with self explanatory column names:
5. Specifying Culture (Locale)
Now let’s see formatting dates into different languages with the culture parameter.
SELECT FORMAT(GETDATE(), 'd','hi-in') AS [Indian (hi-in) (DD-MM-YYYY)]
GO
SELECT FORMAT(GETDATE(), 'd','en-US') AS [US English (en-US) (MM/DD/YYYY)]
GO
SELECT FORMAT(GETDATE(), 'd','en-gb') AS [Great Britain English (en-gb) (DD/MM/YYYY)]
GO
SELECT FORMAT(GETDATE(), 'd','de-de') AS [German (de-de) (DD.MM.YYYY)]
GO
SELECT FORMAT(GETDATE(), 'd','zh-cn') AS [Chinese (zh-cn) (YYYY/MM/DD)]
GO
SELECT FORMAT(GETDATE(), 'd','ru-ru') AS [Russian (ru-ru) (DD.MM.YYYY)]
GO
SELECT FORMAT(GETDATE(), 'd','gl-es') AS [Spain (gl-es) (DD/MM/YYYY)]
GO
Please note the self explanatory column names for each:
Conclusion
The FORMAT() function is an incredibly flexible tool in SQL Server, ideal for making your output more user-friendly and internationalized. While it should be used with care in terms of performance, it greatly simplifies the formatting of numbers and dates compared to older methods.
Start using FORMAT() in your reporting queries to make your data presentation cleaner and more consistent.
Hello! If you’re working with SQL Server and need to filter records based on a date range, you’re in the right place. In this article, we’ll discuss how to select data between two dates in SQL Server using best practices to ensure accuracy and performance. Date filtering is a common task when analyzing time-bound records irrespective you being SQL developer or production DBA.
Reasons to Select Data Between Two Dates:
You want to check the successful backups happened between two dates
What the are indexes which were part of Index maintenance in last couple of weekends
What is the data/log file growth in a month etc.
When working with large datasets, retrieving only the relevant time-based records helps.
Microsoft SQL Server provides different methods to select data between two dates. The most common ones are as follows:
BETWEEN Operator
Arithmetic Operators Greater Than (>) and Less Than (<)
SELECT Data Between Two Dates in SQL Server Using BETWEEN Operator:
The BETWEEN keyword is inclusive, that means it includes both the start and end dates.
Syntax:
SELECT * FROM [TableName] WHERE [DateColumn]
BETWEEN 'StartDate' AND 'EndDate'--Ensure the date format matches the column data type (YYYY-MM-DD is recommended).
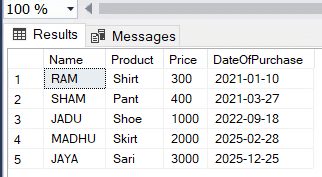
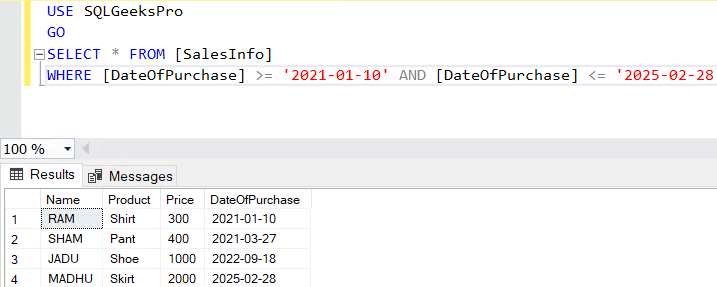
Now let’s take an example. Assume you have the following data in a SalesInfo table:
You want to extract the sales data between 2021-01-10 and 2025-02-28 (yyyy-mm-dd), the query would be as follows:
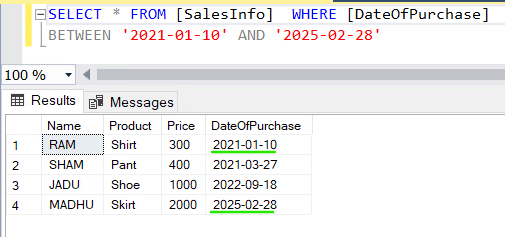
SELECT * FROM [SalesInfo] WHERE [DateOfPurchase]
BETWEEN '2021-01-10' AND '2025-02-28'--Ensure the date format matches the column data type (YYYY-MM-DD is recommended).
Pay attention to the Result set, you can see that both the dates are included.
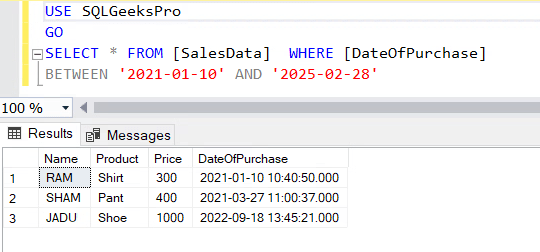
It was pretty simple isn’t it. Now let’s see how stuff works if the date column is of type Datetime/Datetime2.
Make a note of the underlined datetime in red:
Execute the same query for ‘SalesData’ table and let’s compare the result sets:
Important to realize here is the underlined datetime value has not appeared in the result set though we said that BETWEEN operator is inclusive. Well, the catch here is when you specify the only date for a column of having data type Datetime/Datetime2 it simply considers midnight (12 am).
In other words SQL Engine interprets ‘2021-01-10‘ as ‘2021-01-10 00:00:00.000’ and ‘2025-02-28’ as ‘2025-02-28 00:00:00.000′. Because ‘2025-02-28 21:26:54.000’ is greater than ‘2025-02-28 00:00:00.000’, it is not included.Now you know why SQL omitted the underlined date in the above example.
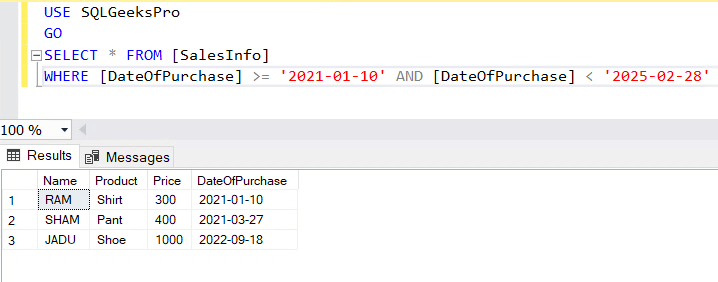
SELECT Data Between Two Dates using Arithmetic Operators Greater Than (>) and Less Than (<)
These operators allows the flexibility to include or exclude the start and end dates by specifying equal operator along with them. That means if you use >= and <= it will work just like BETWEEN operator. Again if you are dealing with Datetime/Datetime2 data type, the same concept of midnight applies as described above.
Let’s consider the SalesInfo table where the data type for the date column is Date.
SELECT * FROM [SalesInfo]
WHERE [DateOfPurchase] >= '2021-01-10'AND [DateOfPurchase] <='2025-02-28'
The result set shows that both the dates are included:
As mentioned earlier it has the flexibility to exclude any of the dates. In the below example the end date is excluded by mentioning (<) operator.
SELECT * FROM [SalesInfo]
WHERE [DateOfPurchase] >= '2021-01-10'AND [DateOfPurchase] <'2025-02-28'
Conclusion:
Selecting SQL Server data between two dates is a fundamental but powerful task. Whether you’re using BETWEEN, >= AND <, the key is understanding how SQL Server handles date and time. With these techniques, you can write efficient and accurate queries to get the data you need.
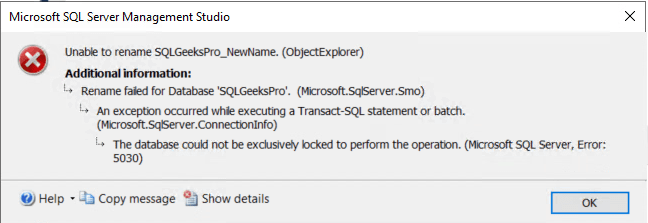
Hi there! In this article we are going to discuss how to resolve the error “The database could not be exclusively locked to perform the operation. (Microsoft SQL Server, Error: 5030)”
You need to have exclusive lock on the database to rename the db. Exclusive lock means there are no other database connections open/using the database. SQL Engine is smart enough not to allow database name change while other users are accessing the database.
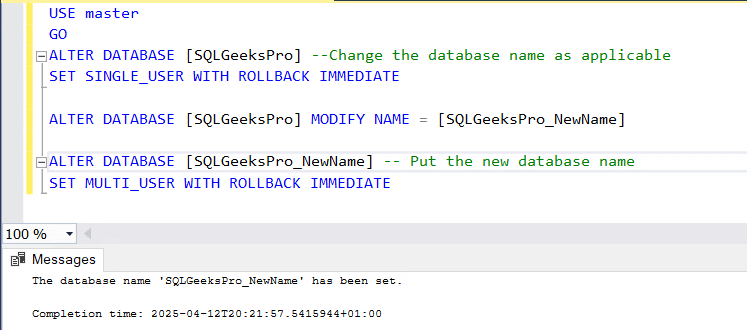
Query to Resolve Database could not be exclusively locked:
Following query will switch the database from Multi User mode to Single User mode, then rename the database and then set it back to Multi User mode.
USE master
GOALTER DATABASE [DatabaseName] --Change The Database NameSET SINGLE_USER WITH ROLLBACK IMMEDIATEGOALTER DATABASE [DatabaseName] MODIFY NAME = [NewDatabaseName]
GOALTER DATABASE [NewDatabaseName] --Put the new database nameSET MULTI_USER WITH ROLLBACK IMMEDIATE
Point often overlooked in the above query is the final statement, where you need to put the new database name.
To demonstrate please find the following Example for database named “SQLGeeksPro” renaming to “SQLGeeksPro_NewName”
This article is in continuation of How To Rename SQL Server Database and here we are going show how to Rename SQL Database Logical and Physical File Names.
I am sure you have already got the idea from the previous article on what is logical and physical file name. The query we used to check the database file details is as follows: We are going to use this multiple times to verify the file details.
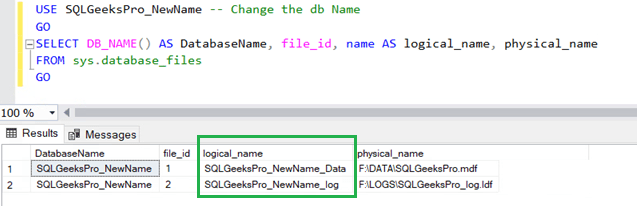
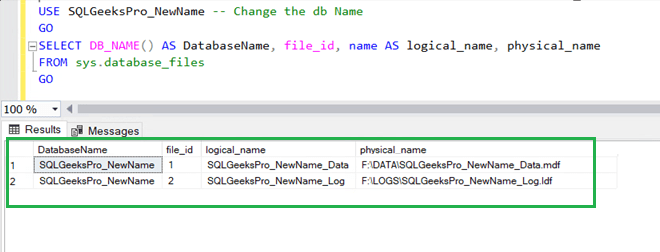
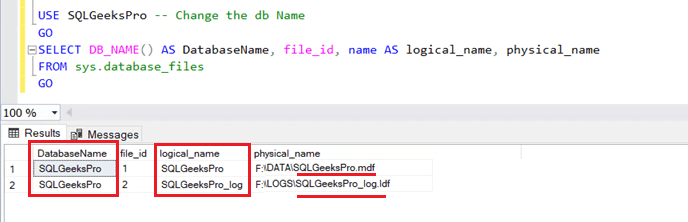
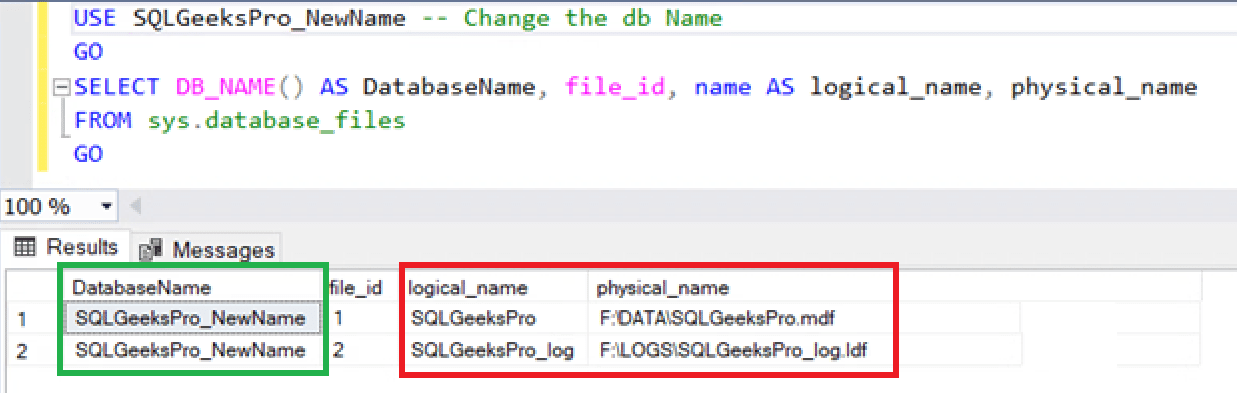
USE SQLGeeksPro_NewName -- Change the db NameGOSELECT DB_NAME() AS DatabaseName, file_id, name AS logical_name, physical_name
FROM sys.database_files
GO
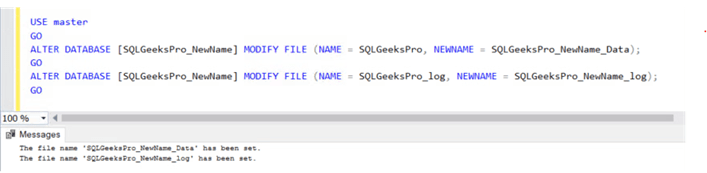
Now we are going to rename SQL Database logical and physical file name.
Now let’s check the database file details again by executing the first query.
Example result set:
As can be seen till now we are able to rename the database name and logical file name. Next and final step is to rename the physical file name.
Things become a bit tricky here as you can’t rename physical files while the database is online. Therefore I had mentioned in the first article that you need downtime.
Steps To Rename SQL Database Physical File Name:
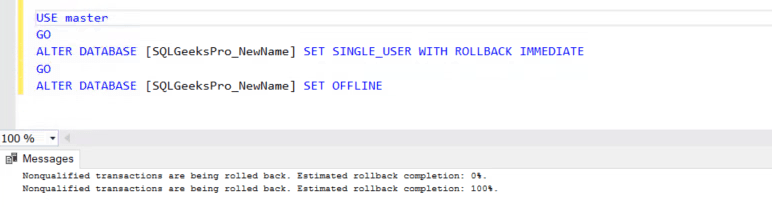
To rename physical file name we have to take the database offline and for that we need exclusive access to the database and hence we’ll first put the database in Single User mode. If there are any transactions running from application, it’s recommended to let them complete first.
In the below query, first statement will rollback any open transactions and set the database in single user mode. The second statement will put the database into offline state.
Step1: Put the database in Offline State
USE master
GOALTER DATABASE [SQLGeeksPro_NewName] SET SINGLE_USER WITH ROLLBACK IMMEDIATEGOALTER DATABASE [SQLGeeksPro_NewName] SET OFFLINE
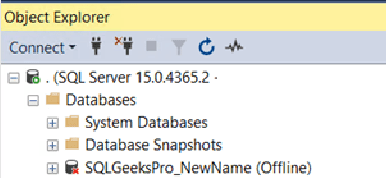
In SSMS the database status will look like below:
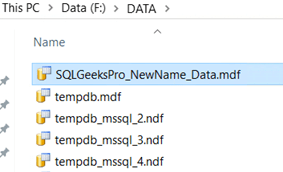
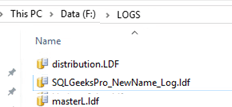
Step2: Rename the Physical Files
Go to the physical locations of data and log file and rename them. Below screen shot shows example for primary data file. You have to rename all the data and log files in respective physical locations.
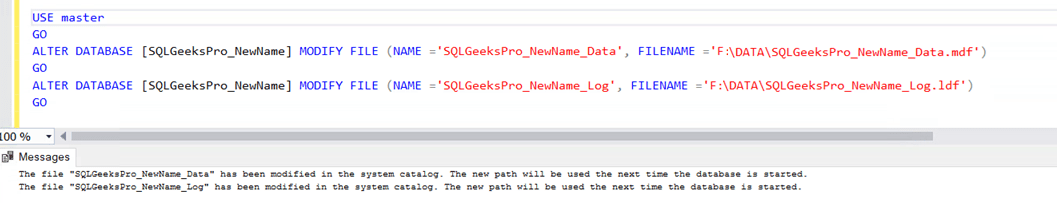
Step3:Update System Catalog
You have to inform SQL Server Engine that physical file name have been changed for the data and log files so that when you bring up the database it can refer the metadata and identify the new names. Otherwise it will try to look for the the old physical file names and will fail to bring the database online.
The message shows that the system catalogs have been updated and new path will be used after the database is started.
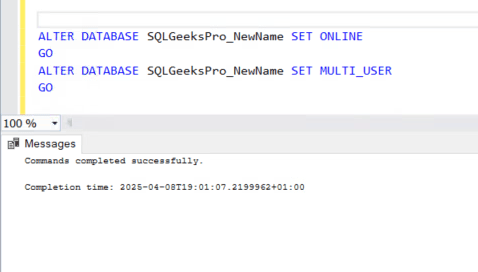
Step4: Bring up the database using the below query
USE master
GOALTER DATABASE [SQLGeeksPro_NewName] SET ONLINEGOALTER DATABASE [SQLGeeksPro_NewName] SET MULTI_USER
Final step is to verify if all files have been renamed successfully as desired/as per organization standards.
You can execute the very first query provided in this article again:
Conclusion:
As can be seen above, renaming a SQL Server database can be done easily with a few steps. Rename not only SQL Server database alone but also logical and physical file names.
Feel free to leave your thoughts below in comment sections.
Hi There! Today we are going to discuss How To Rename SQL Server Database the best way. Renaming a SQL Server database can be a straightforward process, but it is essential to follow the right steps to ensure data integrity and avoid disruptions. Trust me most of the DBAs think it is too easy to perform and end up missing an essential step which is discussed here.
Why Rename SQL Server Database?
Before jumping into the steps, it’s important to understand why you might need to rename a database. Common reasons are as follows:
Rebranding: Aligning the database name with a new organizational structure or branding.
Clarity: Improving the descriptiveness of the database name for better understanding among team members.
Organization: Consolidating database names for better management in multi-database environments.
Version Control: Adding version numbers or dates for better tracking.
Regardless of the reason, there may come a time when you want to or need to rename a database. In this tip we’ll look at the best option.
Prerequisites to Rename SQL Server Database:
First ensure the following:
Backups: Always have a recent backup of your database. This provides a safety net in case something goes wrong during the renaming process.
Permissions: Verify that you have the necessary permissions to rename the database. Typically, you need to be a member of the db_owner role or have ALTER permission
Downtime: The process needs downtime and hence always secure downtime approval/inform stake holders as per your organization process.
Two Different Methods can be used to Rename SQL Server Database:
Using SSMS (SQL Server Management Studio)
Using T-SQL
First of all let’s check and note the database details by running the following query:
USE SQLGeeksPro -- Change the db NameGOSELECT DB_NAME() AS DatabaseName, file_id, name AS logical_name, physical_name
FROM sys.database_files
GO
The Results will be as shown below:
Make a note of the highlighted details in the above example.
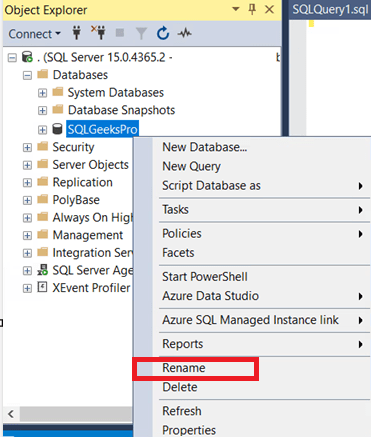
Rename SQL Database using SSMS:
Step 1: Connect to SQL Server
Open SQL Server Management Studio (SSMS) and connect to the SQL Server instance that contains the database you want to rename.
Step 2: Right click on the database and select the Rename option
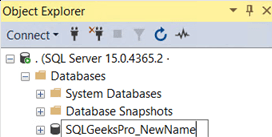
Step 3: Type in the new name you want for the database
Now if you are not able to rename it because of the error message “The database could not be exclusively locked to perform the operation. (Microsoft SQL Server, Error: 5030)” then refer Database could not be exclusively locked
Rename SQL Database using T-SQL:
Step1: In SSMS open a new Query Window
Step2: Execute the below Query:
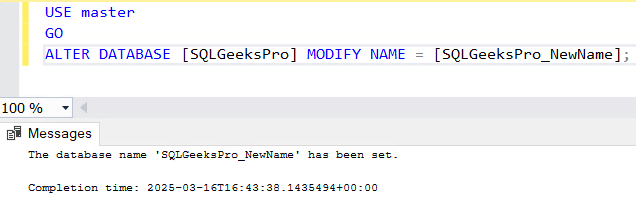
USE master
GOALTER DATABASE [CurrentDatabaseName] MODIFY NAME = [NewDatabaseName] -- Change the CurrentDatabaseName and NewDatabaseName as required
For Example:
This command works for SQL Server 2005, 2008, 2008R2, 2012, 2014, 2016, 2017, 2019 and 2022. Alternatively you can use sp_renamedb as well.
USE master
GOEXEC sp_renamedb 'CurrentDatabaseName','NewDatabaseName'
Most of us think that in this way we have completed the database renaming. In other words you’ll be able to see the new name in SSMS. Important to realize and point often overlooked is we have not changed the logical and physical file name. To be sure execute the very first query provided above to check the file names:
Result will be as shown below:
As can be seen in the highlighted portion in green, only the database name got changed and there is no change for logical and physical file names. This may cause confusion in future even if we keep the technical issues aside. We can discuss it in another blog post.
Therefore you need to change the logical and physical file names as well. >>Continue Reading
Hi there! In this blog post, we will explore a SQL query that allows you to list all database users with Permissions in SQL Server. As a DBA you must be able to identify which users have access to specific databases and what permissions they possess.
Understanding Database Users and Permissions
Before we dive into the SQL query, first let’s clarify the concepts of database users and permissions.
Database Users:
A database user is an individual or application that interacts with a SQL Server database.
Each user account is mapped to a Windows login or a SQL Server login.
Users are associated with roles and are granted permissions to perform specific actions within the database.
Permissions:
In SQL Server, permissions are used to control access to database objects, such as tables and views. Each user in a database has a set of permissions that determine what they are able to do within the database, such as SELECT, INSERT, UPDATE, DELETE, and EXECUTE.
Query to List All Database Users With Database Role Permissions
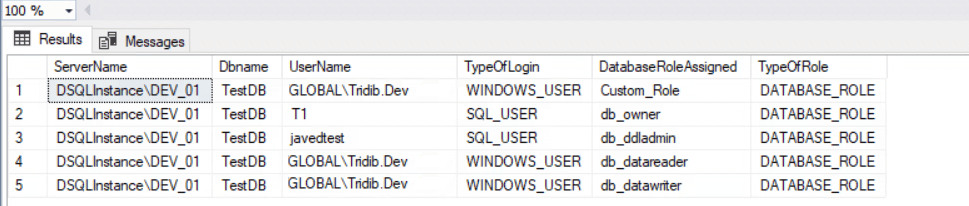
USE TestDB -- Change the db NameGOSELECT
ServerName=@@servername, Dbname=db_name(db_id()),p. name as UserName,
p. type_desc as TypeOfLogin, pp. name as DatabaseRoleAssigned, pp. type_desc as TypeOfRole
FROM sys.database_role_members roles
JOIN sys.database_principals p ON roles.member_principal_id = p.principal_id
JOIN sys.database_principals pp ON roles.role_principal_id = pp.principal_id
WHERE p. type_desc NOT IN('DATABASE_ROLE','ASYMMETRIC_KEY_MAPPED_USER')
AND p. name NOT IN ('sys','INFORMATION_SCHEMA','guest','dbo')
Output:
Generally speaking the above output is neat. Point often overlooked is we only got the details of the users which are part of any database roles. In other words I still need to know about users having Execute permission to any Stored Procedure, SELECT/INSERT/UPDATE permission on specific table etc.
Given these points let’s look into the below query.
Query To List All Database Users With Permissions:
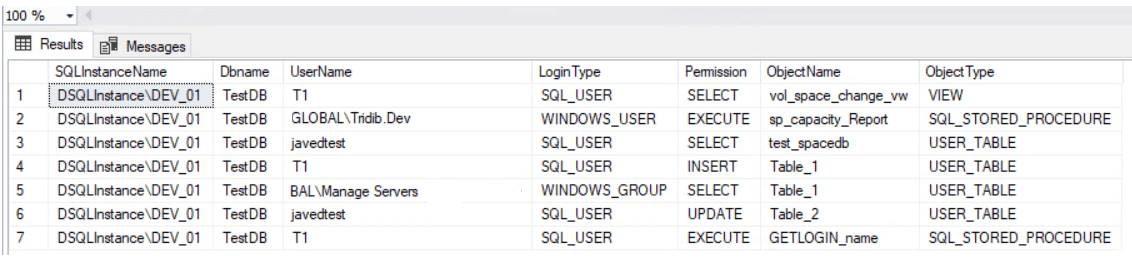
USE TestDB -- Change the db NameGOSELECT
@@servername as SQLInstanceName,
Dbname=db_name(db_id()),
u.name as 'UserName',
u.type_desc as LoginType,
p.permission_name as 'Permission',
o.name as'ObjectName',
o.type_desc as'ObjectType'FROMsys.database_permissions p
INNER JOINsys.objects o ON p.major_id = o.object_idINNER JOINsys.database_principals u ON p.grantee_principal_id = u.principal_id
Output:
As can be seen in the above example output the query shows the permissions on specific objects. Hence you need these two queries to List All Database Users With Permissions.
Important to realize the following points:
The queries returns information about the database roles and permissions on database-level. Therefore it will not return information about server-level permissions.
Both the queries returns information about SQL and Windows users but does not include permission of roles. Hence If you want to see the permissions of database roles please feel free to tweak the query.
These will only shows the permissions for the specific connected database . Hence to check the permissions for all users in all databases, run the query against each database individually or modify the query. You can refer the link Retrieve all permissions for a user in all user databases which provides assigned database roles for a login in all databases.
Conclusion:
In summary managing permissions in SQL Server is a crucial aspect of database administration. Hence I have provided a simple introduction of users and permissions before diving into the query.
With this in mind, you can easily use the queries to list all database users and their permissions. This will certainly help you maintain a secure and compliant database environment.
Regularly reviewing and auditing permissions is essential to ensure data integrity and security in your SQL Server databases.
Hey there! this is the 3rd article in the category “SQL Server DBA Tutorial: Beginners to Pro”. Here we are going to discuss about SQL Server System databases. The prior article in this series is Understanding SQL Server Versions and Editions
Introduction
To begin with, when you install SQL Server, it creates the system databases automatically. Understanding the role of system databases is crucial. Here we are going to explore everything you need to know about SQL Server system databases,
including their purpose, components, and best practices for managing them.
Table of Contents
What are System Databases?
Importance of System Databases
Understanding the Core System Databases
Master
Model
Msdb
Tempdb
Resource Database
Distribution Database
Best Practices to maintain the System Databases
What are System Databases?
System databases are the backbone of a SQL Instance. Each of them play a critical role in the functioning of the database management system. These databases provide critical services to the server and user databases. Each system database has a specific purpose, and they work in harmony.
Importance of System Databases
System databases contain crucial information about the SQL Server instance, including server-level configurations, system objects, and metadata. Understanding the purpose and components of these databases is essential for efficient database management, backup and recovery, and overall system stability.
Understanding the Core System Databases
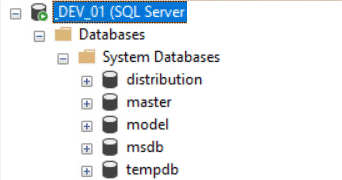
Now let’s take a deep dive into the core System Databases. The below image shows the system databases when you connect to a SQL Instance.
Master Database:
Contains all the system-level information for an instance of SQL Server. The master database is the most important as it is necessary for starting the SQL Server.
This includes instance-wide metadata such as logon accounts, endpoints, linked servers, and system configuration settings.
Also, master is the database that records the existence of all other databases and the location of those database files and records the initialization information for SQL Server. Therefore, SQL Server cannot start if the master database is unavailable.
Model Database:
The model database is used as a template for other databases created in SQL Server, especially when creating user-defined databases.
The entire configuration of the model database, including database options, are copied to the newly created database.
Every time SQL Server is started, it creates tempdb from model hence if model is corrupted, SQL will not come up normally.
Msdb Database:
The msdb database is used mainly by the SQL Server Agent, and also by other features like SQL Server Management Studio, Service Broker, and Database Mail.
SQL Server automatically maintains a complete online backup-and-restore history within tables in msdb.
Tempdb Database:
TempDB is a global resource that is accessed by all the users in the SQL Server Instance
This stores temporary user objects that you create like temporary tables (Global and Local), temporary variables, temporary stored procedures that hold intermediate results during the sorting or query processing, and cursors.
Internal objects like Work Tables, Work files. Intermediate sort results for operations such as creating or rebuilding indexes.
Version stores, which are collections of data pages that hold the data rows that support features for row versioning.
Resource database:
The Resource Database is a hidden, read-only database that contains system objects, system catalogs, and metadata.
SQL Server system objects, such as sys.objects, are physically persisted in the Resource database, but they logically appear in the sys schema of every database. The Resource database does not contain user data or user metadata.
Microsoft created this database to allow very fast and safe upgrades. You can’t see the database by selecting from sys.databases or
executing sp_helpdb. It also won’t show up in the system databases tree in the Object Explorer pane
of SQL Server Management Studio, and it doesn’t appear in the drop-down list of databases from your query windows.
However, this database still needs disk space.
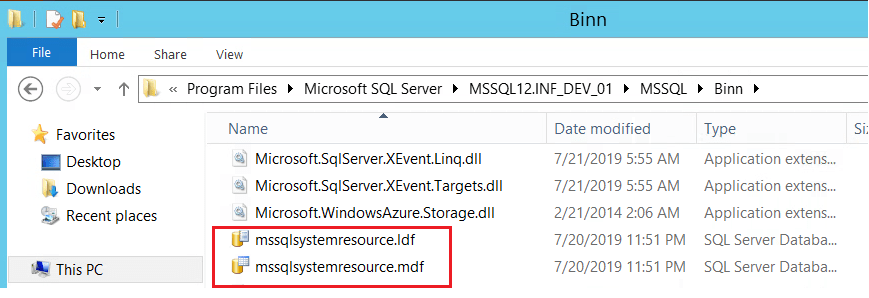
You can see the files in your default binn directory by using Microsoft Windows Explorer. For Example: C:\Program Files\Microsoft SQL Server\MSSQL11.MSSQLSERVER\MSSQL\Binn
mssqlsystemresource.mdf, and mssqlsystemresource.ldf files.
To explain refer the below screen shot:
Distribution Database:
SQL Server creates this database when you configure Replication on SQL Server and you choose the SQL Instance to act as a distributor. It stores replication metadata, history, and the transactions to replicate to other servers.
Best practices to Maintain System Databases:
Create a robust backup strategy for Regular backups of system databases.
Make proper SOP for restoring the system databases so that it is easier in the event of a disaster. Not to mention knowing how to restore system databases is essential for recovering your SQL Server instance.
Managing the size of system databases, especially TempDB, can significantly impact server performance. Hence proper Sizing and Growth Planning is very essential.
Equally important is monitoring solutions to keep an eye on the health and performance of your system databases.
In addition Consider placing system databases on separate disks to prevent contention and optimize performance.
In this article we are going to discuss how to fix incorrect Mexico Time in SQL Server sys.time_zone_info system catalog.
Problem:
One of our customer informed that Mexico changed their DST . In UAT, application is showing correct time which is UTC -6 however in Production the mexico time zone is showing as UTC – 5. The application is referring the sys.time_zone_info system catalog in SQL Server.
Troubleshooting:
In the first place you should understand what is the actual problem. In other words what the customer is talking about. The problem statement it is not very clear if it is SQL Server issue or OS issue or it is something to do with application code.
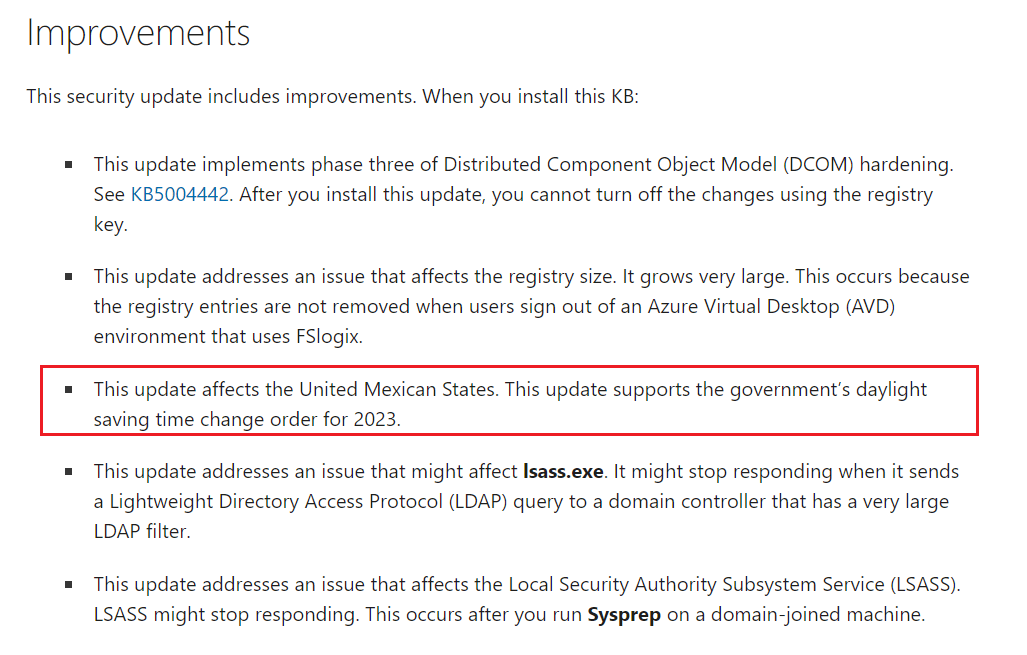
After a short call with the customer we got to know that as per Mexican Government order published in October 26th, 2022, that Daylight Saving Time (DST) in the United Mexican States will not be observed in 2023 calendar year.
Second is to compare the UAT and Production environment.
No change in code at application end.
There is no difference in OS time zone settings in application and database server.
The result of Mexico Time Zone in sys.time_zone_info were different.
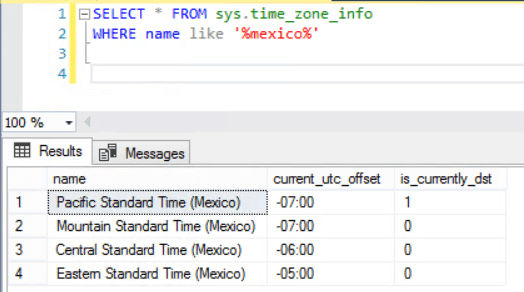
Query to check the Mexico Time Zone information:
SELECT * FROM sys.time_zone_info
WHERE name LIKE '%Mexico%'
Result:
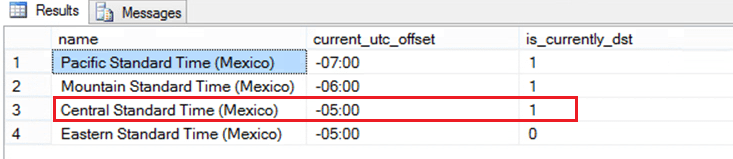
The above result was from UAT where the output is showing correct. Likewise we checked it in Production environment and result is as follows:
Certainly we could see the difference as mentioned by the customer. What next?
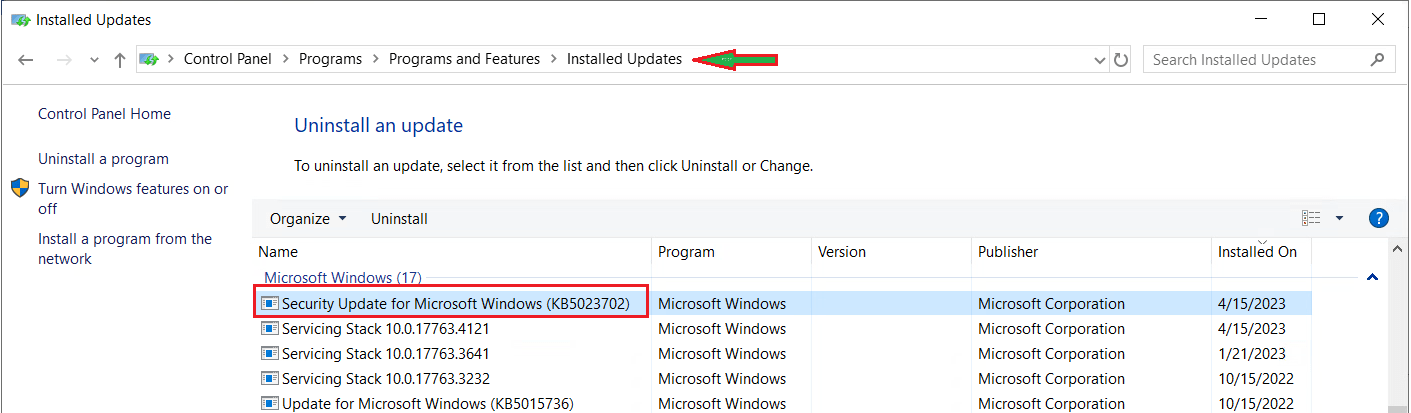
Checked the SQL Server patch and both UAT and Production Instance were in the same patch level
Compared the OS patch level on both the servers and we could find the difference in patches installed
Being DBA you need to know how to verify these stuffs to be able to quickly identify the issue. Below screen shot will help you with the path:
The highlighted patch was not installed in Prod because it was scheduled for next month patching cycle.
A quick read about the patch in the KB article KB5023702 clarifies the issue:
Resolution & Conclusion:
The resolution is a no brainer once you find the issue. You have to follow the process as per your organization and get the patch installed in the server.
To conclude incorrect time zone in sys.time_zone_info is not a SQL Server issue. However being DBA you should be able to troubleshoot, find the root cause and suggest the solution. If customer complains about one server shows correct time zone while the other is incorrect without doing any changes in the application end, you should perform a thorough check at server end. The issue occurred because of not having latest OS patch and you can resolve it by going through the relevant article of the OS patch and get it installed.


 Now let’s check the database file details again by executing the first query.