Introduction
A calendar table is useful for any SQL Server database, as it allows for easy querying and reporting of date-based data. Reporting often requires aggregating or returning data based on date attributes such as weekdays, holidays, quarters, or time of year. Creating a calendar table can save time, improve performance, and increase consistency in data. In this guide, we will walk through the process of creating a calendar table in SQL Server, including the necessary code and best practices for maintaining and using the table.
You can change some of these details to experiment on your own.
Why Use a Calendar Table?
There are several benefits to using a calendar table in your SQL queries. First and foremost, a calendar table can greatly simplify date-based queries. Without a calendar table, you may have to use complex logic to extract the year, month, day, etc. from a date field. With a calendar table, you can simply join to it and use the pre-calculated date fields.
Another benefit of a calendar table is that it can be used to quickly fill in missing dates in your data. If you have a sales table that only has entries for dates when there were actual sales, a calendar table can be used to fill in the missing dates and show “zero” sales for those dates. This can be particularly useful when creating graphs or charts that need to have a consistent X-axis.
Finally, a calendar table can be used to quickly apply filters to your data based on dates. For example, you can use a calendar table to easily filter your data to only show records from the current month, or the last 30 days.
Step 1: Create the Table Structure
The first step in creating a calendar table is to create the table structure. We will be using the following code to create the table. You can also include other columns such as quarter or fiscal year, depending on your specific requirements.
CREATE TABLE tblCalendar(
       [Date] Date NOT NULL,
       [Day] char(10) NOT NULL,
       [DayOfWeek] tinyint NOT NULL,
       [DayOfMonth] tinyint NOT NULL,
       [DayOfYear] smallint NOT NULL,
       [PreviousDay] date NOT NULL,
       [NextDay] date NOT NULL,
       [WeekOfYear] tinyint NOT NULL,
       [Month] char(10) NOT NULL,
       [MonthOfYear] tinyint NOT NULL,
       [QuarterOfYear] tinyint NOT NULL,
       [Year] int NOT NULL,
       [IsWeekend] bit NOT NULL,
    )

ALTER TABLE tblCalendar
ADD CONSTRAINT PK_CalendarDate PRIMARY KEY (Date);
You should add a primary key to ensure the data is unique and can be easily searched.
Step 2: Populate the Table with Data
Once the table structure is created, it’s time to populate it with data. You can use a series of INSERT statements to add data for a specific range of dates. In the below example I am inserting 365 days of data starting from 1st Jan’23.
DECLARE @StartDate DATE
DECLARE @EndDate DATE
SET @StartDate = '2023-01-01' --Put the start date as per your requirement
SET @EndDate = DATEADD(d, 365, @StartDate) --Change the no. of days as needed
WHILE @StartDate <= @EndDate
      BEGIN
             INSERT INTO tblCalendar values
             (
                   @StartDate,
                              CONVERT(CHAR(10), DATENAME(WEEKDAY, @StartDate)),
                              CONVERT(Tinyint,DATEPART(WEEKDAY, @StartDate)),
                              CONVERT(Tinyint,DATEPART(DAY, @StartDate)),
                              CONVERT(smallint, DATEPART(DAYOFYEAR, @StartDate)),
                              DATEADD(day, -1, CONVERT(DATE, @StartDate)),
                              DATEADD(day, 1, CONVERT(DATE, @StartDate)),
                              CONVERT(tinyint, DATEPART(WEEK,@StartDate)),
                              CONVERT(CHAR(10), DATENAME(MONTH, @StartDate)),
                              CONVERT(TINYINT, DATEPART(MONTH, @StartDate)),
                              CONVERT(TINYINT, DATEPART(QUARTER,@StartDate)),
                              CONVERT(INT, DATEPART(YEAR,@StartDate)),
                              CASE
                                   WHEN CONVERT(Tinyint,DATEPART(WEEKDAY, @StartDate)) in (1,7)
                                   THEN 1
                                   ELSE 0
                                 END
             )

             SET @StartDate = DATEADD(dd, 1, @StartDate)
      END
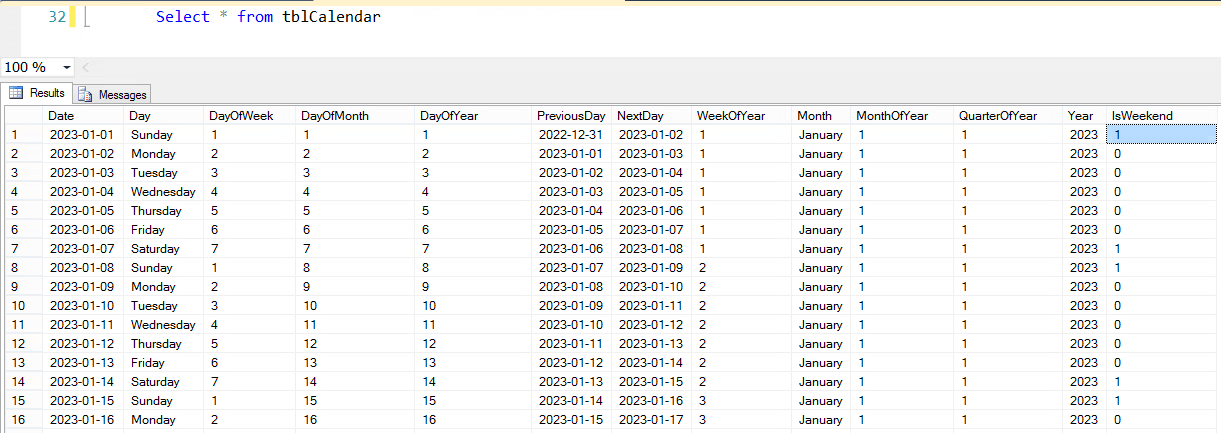
Sample Output:
Next Steps:
To ensure that the calendar table is as efficient as possible, it’s important to set up appropriate indexes and constraints once the table grows considerably large.
Conclusion:
Creating a calendar table in SQL Server can greatly improve performance and simplify your code when joining data on date-related attributes in reporting, analytics, or OLTP use cases. These tables also make it easier for reporting engines to consume the data and increase maintainability by keeping a single copy of calendar data in one place, reducing the risk of coding errors when working with complex date calculations
You can also refer the following link for more idea https://www.sqlshack.com/designing-a-calendar-table/
You may also like the below articles:
Script To List SQL Agent Jobs and Schedules
Script to Change SQL Agent Job Schedule
Script to Find Agent Job in Execution