This article is about the Synchronous Database Mirroring misconceptions. Synchronous is one of the operating modes of SQL Database Mirroring also known as High Safety mode; High Safety of transactions in case of failover.
Let’s see what Microsoft TechNet says:
When the session begins, the principal server begins sending its active log to the mirror server. The mirror server writes all of the incoming log records to disk as quickly as possible. As soon as all of the received log records have been written to disk, the databases are synchronized. As long as the partners remain in communication, the databases remain synchronized.
After synchronization finishes, every transaction committed on the principal database is also committed on the mirror server, guaranteeing protection of the data. This is achieved by waiting to commit a transaction on the principal database, until the principal server receives a message from the mirror server stating that it has hardened the transaction’s log to disk. Note the wait for this message increases the latency of the transaction.
The common misconceptions/confusions are as follows:
- Principal server first commits the transaction and then sends log records to the mirror and wait until mirror server writes the same to the database.
- Principal sends its log to the mirror and once it commits in mirror then only it commits in principal.
If you know what happens during commit, it is a bit easier. Commit does not mean the transaction is written to the database (data file). When you commit a transaction SQL Server writes it to the log file on the disk, in other words it hardens the log. This confirms the durability of the transaction.
Let’s take an example of the following transaction:
Begin Tran
Statement 1
Statement 2
Commit;
SQL Server writes the log records in the log file of principal database as per normal process of logging. Mirror server follow the same.
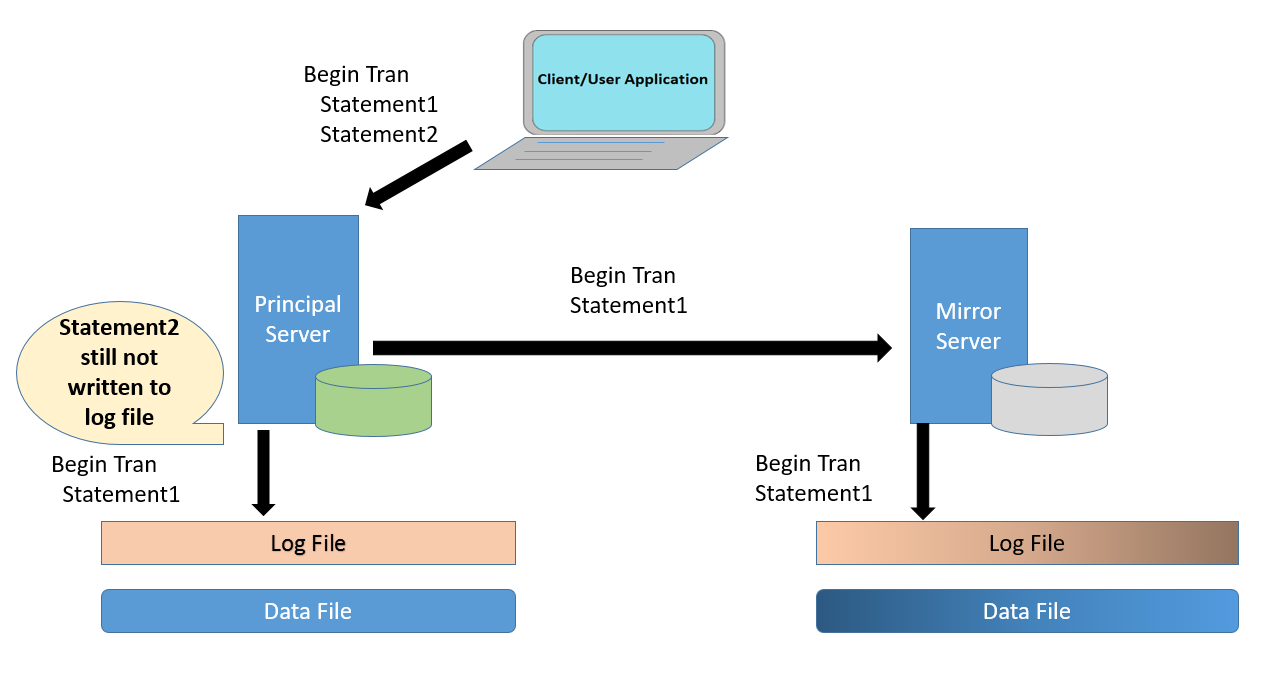
When the application fires a commit statement, Synchronous Database Mirroring mechanism has to confirm, mirror server has written all the log records related to the transaction before sending confirmation to the application.
So, from above example transaction, It is possible that SQL Server has already written the Begin Tran and Statement 1 to the log in principal and mirror server.
The following diagram depicts the same:
Now lets see what happens when application fires a Commit Tran:
-
- Principal server receives the commit transaction from client.
- The principal server writes the log records for the transaction to the log file and sends the log records to the mirror server at the same time as shown below.
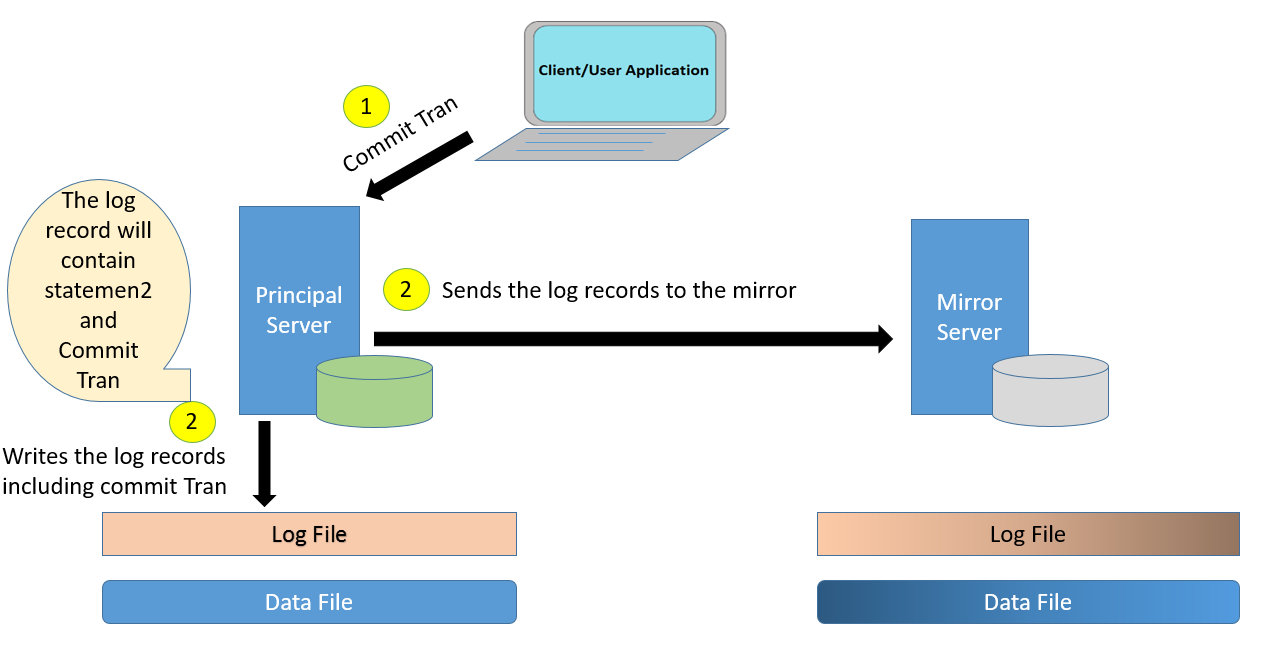 Note: Principal Server has written the log records to the log file. So one of the misconception is cleared here. Principal Server does not wait for acknowledgement from mirror to commit the transaction.
 - Principal server completes the I/O but it cannot send the confirmation to the client at this point.
- The mirror server hardens the log in disk.
- I/O on the mirror server completes.
- Returns an acknowledgement to the principal server.
- On receiving the acknowledgement from the mirror server, the principal server sends a confirmation/Acknowledgement to the client.
The following diagram shows the complete cycle:
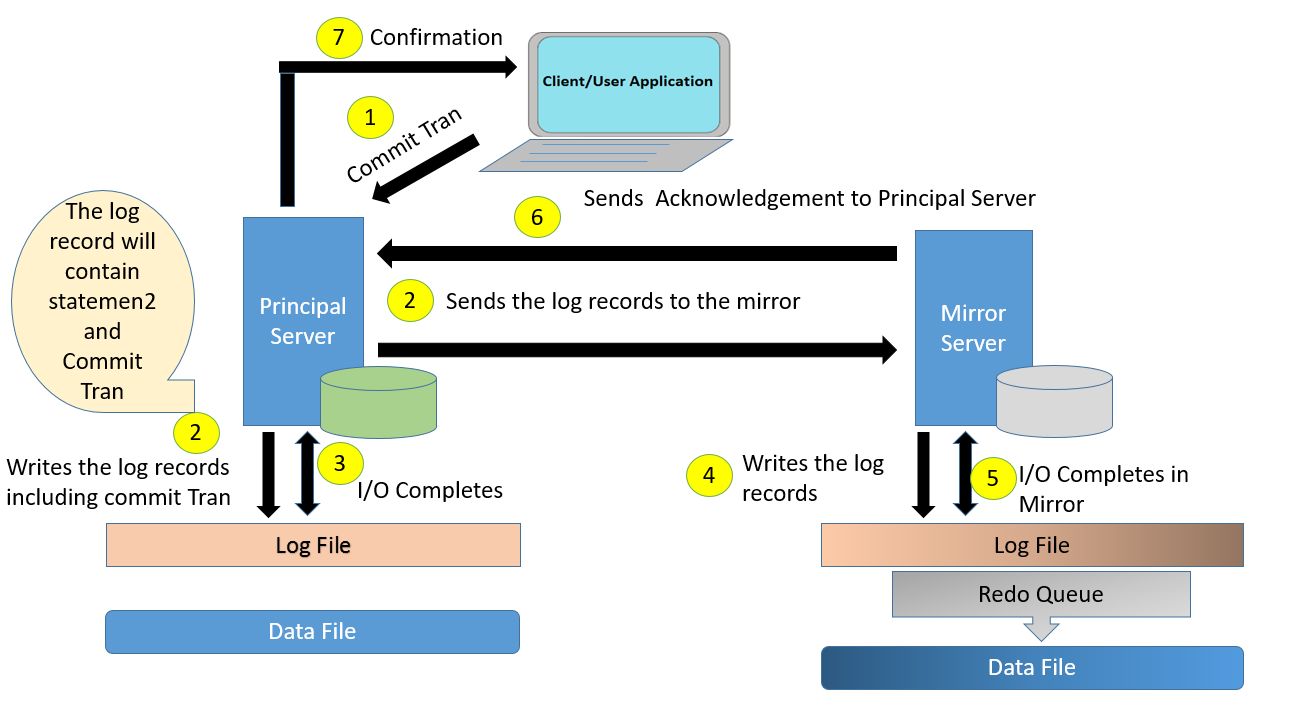
Note: The misconception, Principal Server waits until Mirror Server writes the transactions to the mirror database is not true. Synchronous database mirroring confirms that the Mirror writes the log records to the log file and not data file, before sending acknowledgement, hence even if the principal crashes after that, all the log records of the committed transactions are durable and mirror can take over the role of principal. And that is why it is also know as High Safety Mode.
The mirror server continuously writes data to mirror database from redo queue. In Asynchronous mirroring the Principal Server does not wait for the Acknowledgment from the mirror.
I hope this clears few misconceptions or confusions of Synchronous database mirroring. Please let me know if you have any questions.
You may like the following articles as well:
Myth around Remote Query Timeout Option
Remove or Delete Tempdb data file without restarting SQL Server
Fact about Dedicated Administrator Connection (DAC)
SSRS Encryption Key Backup Information
SQL Database Restore using NetBackup
